Basic Beginner Cavalry Guide
„How to Crush Enemy Lines with Speed and Precision“
1. Core Principles
A. Cavalry’s Strengths
- Speed: Amplifies armor penetration and lets you dictate engagements.
- Mobility: Flank, retreat, and reposition faster than any unit type.
- Shock Value: Break formations, disrupt ranged units, and assassinate lost infantry.
B. The 3 Pillars of Cavalry Dominance
- Timing (Charge when enemies are distracted or unbraced).
- Target Selection (Prioritize archers, bulk of enemies, out of position infantry/cav)
- Survivability (Retreat after charges; don’t overcommit).
2. Meta Cavalry Units (2025)
S-Tier Cavalry
| Unit | Tier | Role | Key Traits |
|---|---|---|---|
| Winged Hussars | T5 | Flanker | Charge | Long(est) Lance (Range) |
| Yanyuedao | T5 | Hard CC | AOE Spread Flanker | CCI – CC provider | AOE DPS |
| Yeomen | T4 | Flanker | Charge | Increased charge stats | Lancer |
| Dagger Lancers | T4 | Flanker | Follow Commander Charge | Strong buffs + Unpredictable Flanker with Commander Follow |
| Companion Cavalary | T4 | Flanker | Openfield fighter | AOE split hitter | Two Weapon stages, high mobility, high AOE flank DPS + Sword autohits combined with high movement speed and selfbuffs |
Budget Picks
- T3 Outriders: Fast, cost-effective for harassing ranged units.
- T2 Iron Cap Cavalry: Decent charge damage for early-game players, high DMG to out of position units
3. Charge Mechanics & Damage Optimization
A. The Charge Sequence
[Initiation Phase] → [Speed Build-Up] → [Impact] → [Retreat/Reposition] - Initiation: Use formation commands to build basic movementspeed up
- Speed Build-Up: Charge downhill or on flat terrain for maximum speed modifier.
- Impact: Aim for clumped infantry or unprotected ranged units.
- Retreat: Withdraw to avoid braced pikes or hero ultimates.
B. Damage Formula
2. How Speed Modifiers Are Determined
The speed modifier (X) is not fixed—it scales dynamically based on:
- Unit’s Base Speed: Faster units (e.g., comapnion cav at 9.8 speed) inherently gain larger modifiers.
- Charge Momentum: Speed increases as cavalry builds momentum during a charge.
- Terrain: Downhill charges boost speed (and thus X), while uphill charges reduce it.
Example Scaling (Community Estimates):
| Cavalry Speed | Speed Modifier (X) |
|---|---|
| 7.0 (Slow) | ~1.0x |
| 8.5 (Average) | ~1.2x |
| 9.8 (Fast) | ~1.3–1.4x |
| 10.5 (Max*) | ~1.5x |
*Assumes max speed buffs (e.g., veterancy perks, doctrines).
Final Damage = Base Damage × (1 – (Target Armor / (AP × Speed Modifier)) × Veterancy Bonuses
- Example: Cav A (AP 1,800) at 9.8 speed (1.3x modifier) vs. T4 Infantry (600 armor):
Damage = 1,800 × (1 – (600 / (1,800 × 1.3)) = 1,800 × 0.74 ≈ 1,332 damage.
4. Positioning & Terrain
A. Ideal Charge Path (Diagram)
          [High Ground]
              ▲
              │ Speed Build-Up
              ▼
[Flank Route] → [Impact on Archers/Backline]
              ▲
              │ Retreat Path
              ▼
[Supply Point] - Key: Avoid frontal charges into braced pikes. Use elevation to maximize speed.
B. Terrain Tips
- Best: Plains, hills, and open flanks.
- Worst: Forests, urban chokepoints, and uphill slopes.
5. Target Priority
A. Target Hierarchy
- Ranged Units: Archers, muskets, and artillery (e.g., Shenji Grenadiers).
- Isolated Units: Out of position Infantry, back braced pikes, range afk cav etc.
- Clumped Infantry: Units mid-engagement (e.g., Sunward Phalanx in melee).
B. Avoid These Targets
- Braced pikes
- Shield walls + Range/Infantry with hero support unless mid fight
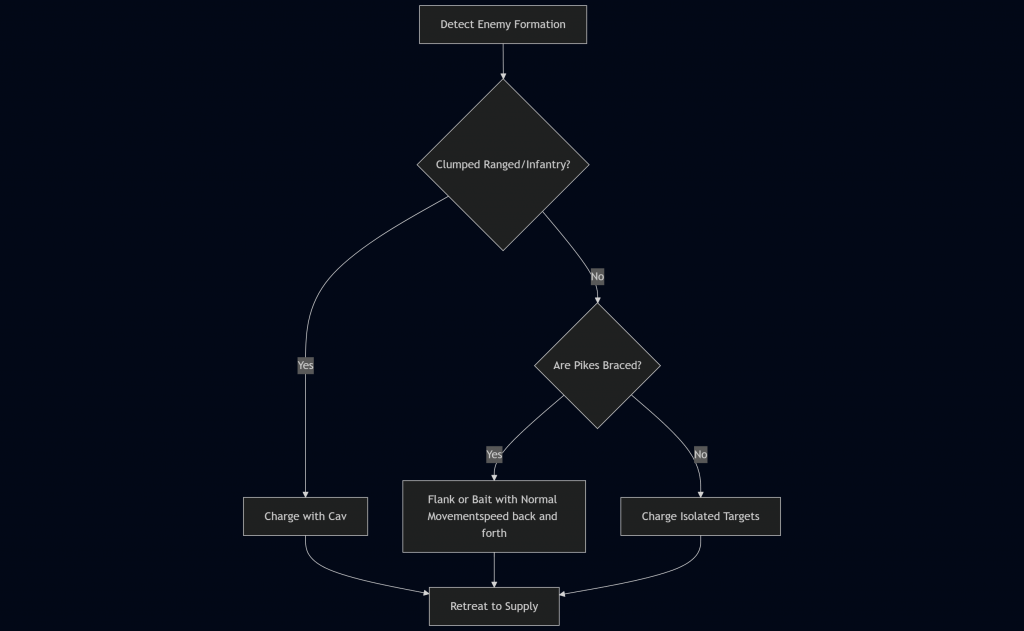
7. Countering Anti-Cavalry
A. Anti-Pike Tactics
- Flank Braced Pikes: Never charge head-on. Use terrain to circle behind them.
- Caltrop Avoidance: Look for visual area slow debuffs (caltrops, CD smoke etc) and dont charge in face of range / cc | stagger unit dps
Basic Understanding Chart