Overview
Unit Type
- The Winged Hussars are a heavy shock cavalry unit. They wield long lances for devastating charges and boast high mobility for a heavy cavalry class.
Playstyle Summary
- Known for their iconic charge and strong impact, Winged Hussars excel at shattering enemy formations, punishing isolated targets, and flanking to cause widespread disruption. They require careful timing to avoid braced pikes or dense defenses.
Key Characteristics
- Devastating Charge – Their unique lance charge can knock down or outright destroy squishy units in a single pass.
- Good Mobility for Heavy Cavalry – They retain fair maneuverability, allowing them to reposition or retreat faster than some other heavy cav units.
- High Burst Potential – In the first clash, Winged Hussars can cripple or kill enemy squads, creating a significant momentum shift.
- Iconic Look & Morale Factor – The aesthetic wings are more than cosmetic flair; they strike fear into less-experienced opponents who might not brace in time.
Abilities & Mechanics
Note: Skill names can vary by season or server. The mechanics below provide a general sense of how Winged Hussars typically function.
- Winged Charge (Primary)
- A powerful lance charge that gives the Hussars high forward momentum.
- If timed properly, it will knock down most infantry or even cavalry units that aren’t braced or shielded.
- Lance Rest / Brace Recovery
- Some cavalry units have a short downtime between charges to “reset” or re-lower lances.
- Avoid engaging in protracted melee during this downtime because your damage potential is greatly reduced.
- Formation Switching (Spread vs. Tight)
- You can adjust their formation for a narrower, more focused strike or a wider charge that can catch more enemies in a large arc.
- Most Winged Hussar players prefer a narrower formation for maximum impact on a key target or choke point.
Strengths
- Brutal Opening Impact
- A well-executed Winged Hussar charge often one-shots or stuns entire infantry squads before they can react.
- Mobility & Momentum
- Faster than many heavy cavalry, Hussars can rotate around the battlefield to exploit weak flanks or unguarded rear lines.
- Enemy Morale Shock
- Heroes and players alike may panic when they see Winged Hussars barreling down on them, leading to tactical mistakes.
- Potential for Chain Charges
- By hitting multiple squads in quick succession (with short intervals to reform lances if needed), you can quickly swing a fight in your team’s favor.
Weaknesses
- Vulnerable to Braced Pikes & Spears
- Any stable braced formation can neutralize or even kill your Hussars mid-charge, often leading to catastrophic losses.
- Susceptible to Prolonged Melee
- Winged Hussars excel at the charge, but if bogged down or stunned, their survivability is lower than it might seem. They have decent armor, yet drawn-out melee often leads to significant casualties.
- High Leadership Cost
- As a premium heavy cavalry unit, you’ll have fewer points left for other specialized squads. Losing them carelessly is a big blow.
- Focus Fire
- Ranged units, especially gunpowder and crossbows, can thin your ranks before you connect if you charge head-on from a predictable angle.
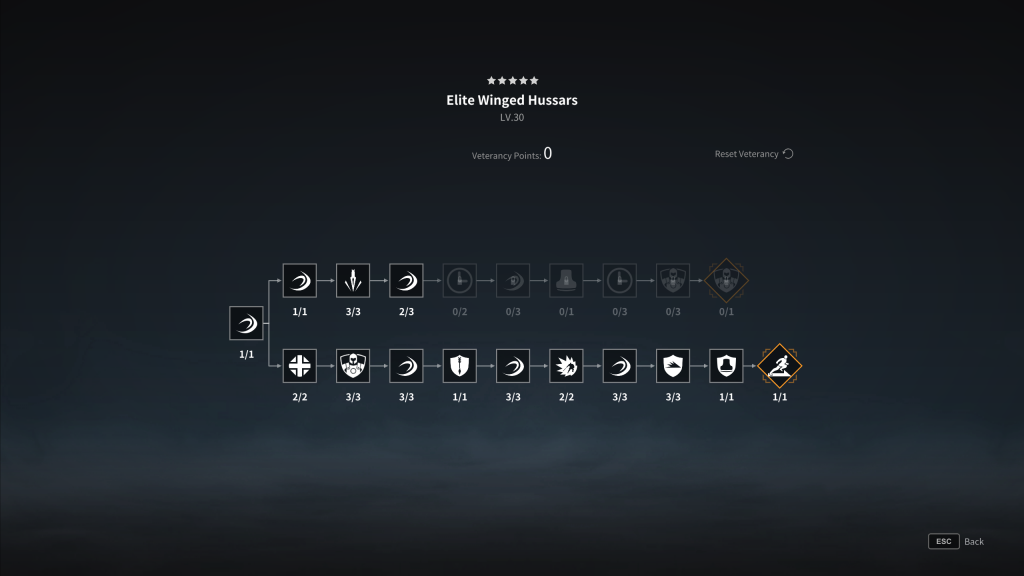
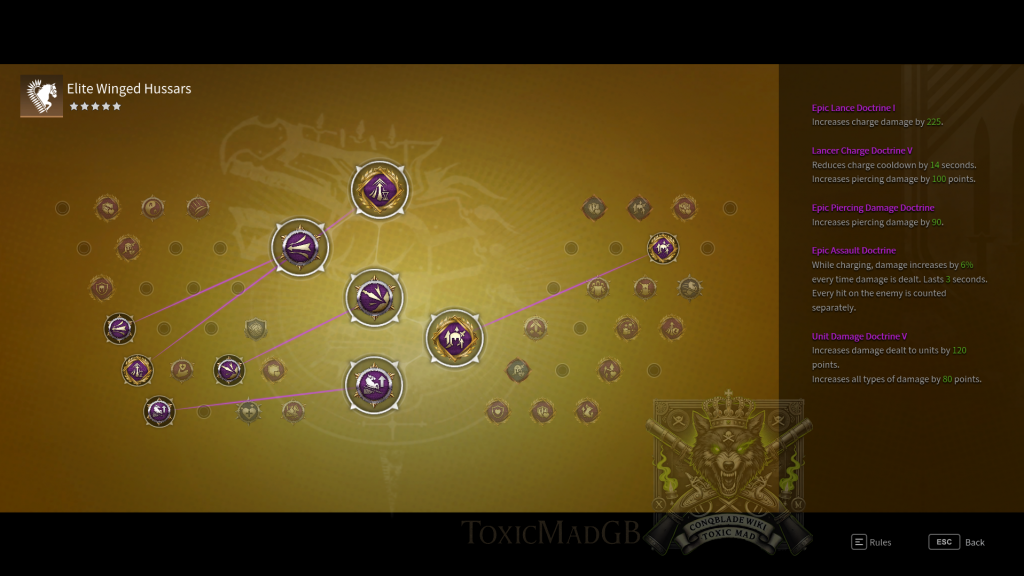
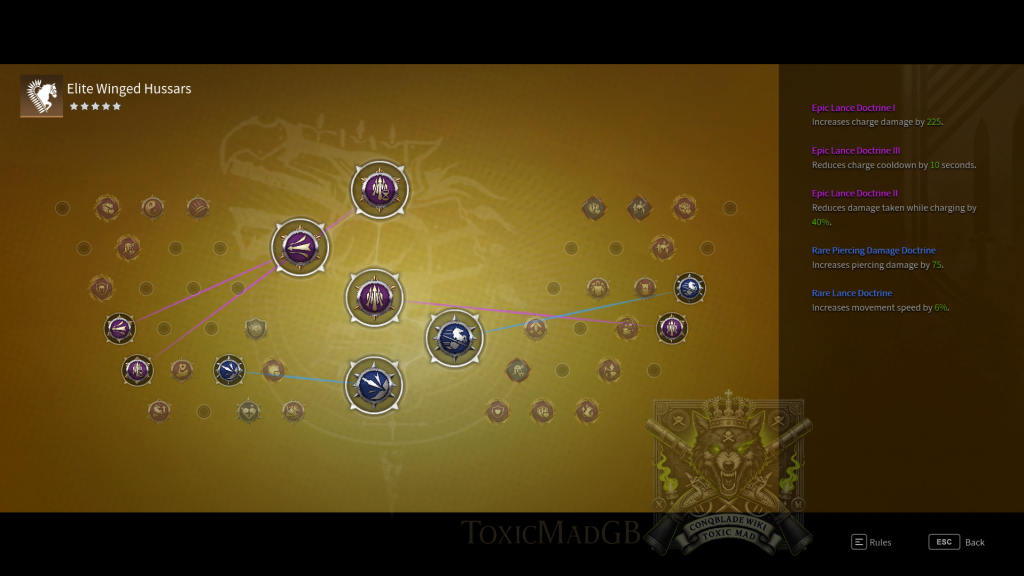
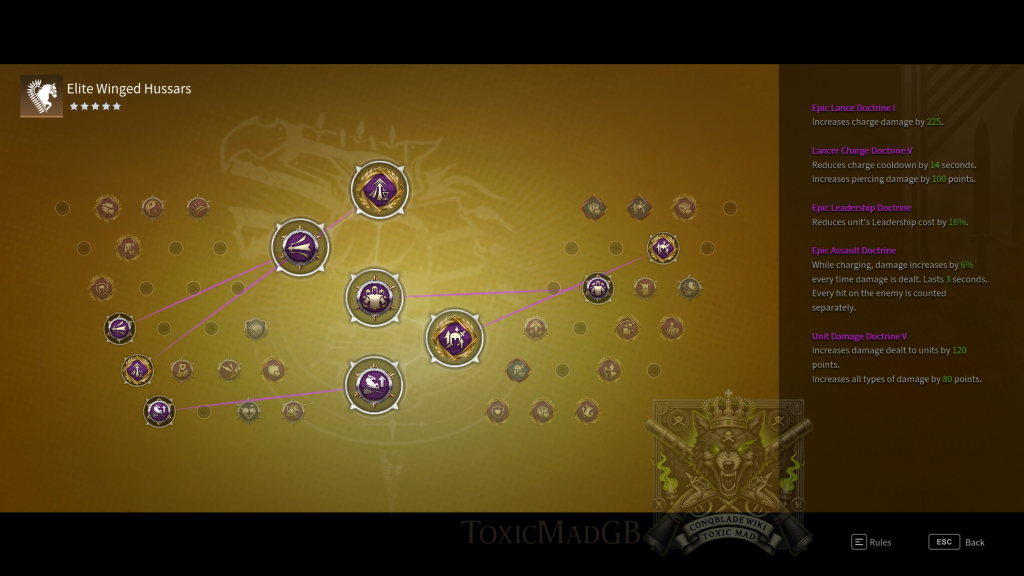
Recommended Doctrines
While doctrine availability and meta choices evolve each season, the following are commonly used to enhance Winged Hussars’ performance:
Unit Strategies and Tactics
- Flank & Rear Attacks
- Position your Hussars to the side or behind the enemy formation. A direct frontal assault is riskier, especially against braced pikes or shield walls.
- Wait for the Right Moment
- Don’t just charge at the first enemy you see. Watch for the enemy to be engaged by allies or to move out of position, then strike.
- Chain Charging
- After a successful impact, quickly pull back. Re-form your lances while rotating to a new angle, then charge again. Rinse and repeat.
- Coordinate with Allies
- If allied infantry or other cavalry are pinning the enemy in place, your Hussars can deliver a knockout blow. Communication is key.
- Avoid Overextending
- Charging deep into enemy lines can be tempting, but if you’re surrounded, the Hussars will suffer heavy losses in the follow-up melee.
Formations & Positioning
- Tight Formation
- Maximizes the punch on a single point. Best used for narrow choke points or hitting a vulnerable infantry cluster.
- Wider Formation
- Covers more ground and can disrupt more enemies, but might reduce the concentrated damage on a single target. Useful if you expect scattered enemy lines.
- Use Terrain
- Hills or downward slopes can sometimes give your cavalry extra momentum. Be mindful of corners or obstacles that can break your charge.
Synergies
- Spears and Shield Infantry
- These units can engage and “hold” the frontline while your Hussars circle for a perfect flank.
- Ranged Harassment (Archers, Muskets)
- Ranged fire can soften enemy lines or force them to cluster, setting the stage for a devastating cavalry charge.
- Other Cavalry Units
- Pair with other shock or medium cavalry to coordinate multi-directional charges for maximum disruption.
- Crowd-Control Heroes
- Heroes with knockdowns, slows, or stuns can keep enemies in place, ensuring your Hussars connect on the perfect angle.
Tips for Success
- Plan Your Attack Paths
- Look at the mini-map and battlefield layout to find the best routes for flanking. Straight-line charges from spawn to the front rarely work well.
- Watch for Enemy Anti-Cavalry
- Identify units like Iron Reapers, Pike Militia, or any unit with bracing potential, and avoid charging head-on.
- Retreat & Re-engage
- Resist the temptation to linger in melee. Pull back, re-charge, and repeat—this is where Winged Hussars truly shine.
- Use Cavalry Speed to Scout
- Even a quick pass near the enemy lines can reveal positions of braced pikes. This prevents disastrous blind charges.
- Preserve Them for Pivotal Moments
- With a high leadership cost and game-changing impact, it’s often best to keep Hussars in reserve until you see the prime opportunity to strike.
Conclusion
The Winged Hussars embody the spirit of shock cavalry in Conqueror’s Blade, able to slam into enemy ranks with crushing force. Their success, however, hinges on timing, positioning, and your willingness to carefully pick engagements. Overextend into a pike block or remain stuck in melee, and you risk losing a valuable unit. But if you excel at choosing the right moment to charge—and coordinating with allies—they can effortlessly sweep the battlefield and secure decisive victories.
Harness their momentum, stay vigilant against anti-cavalry threats, and lead your Hussars boldly to victory. Good luck, and may your charges break the enemy lines!