Mapguide – Augolia
Augolia Siege Map Guide – Conqueror’s Blade
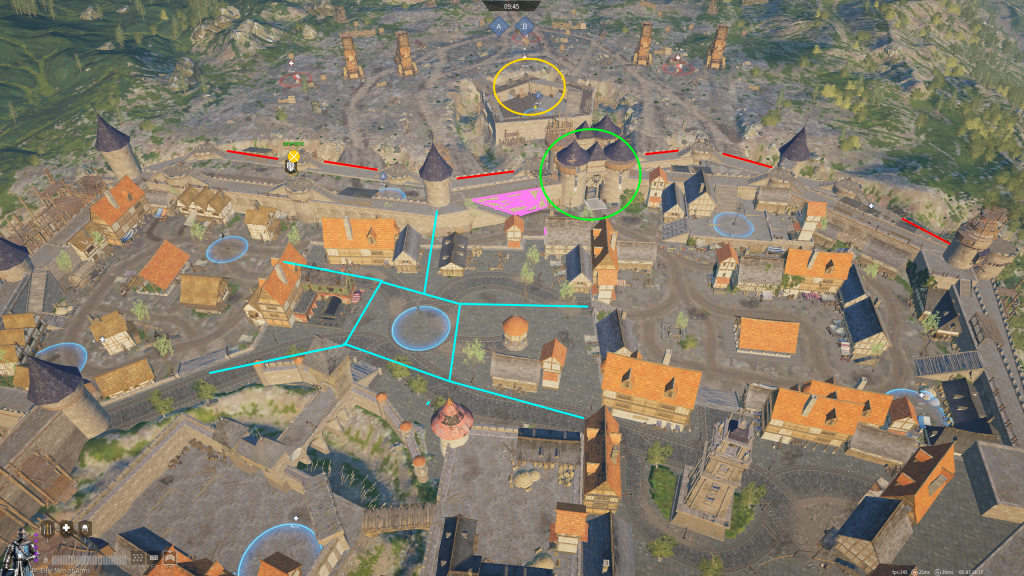
General Overview:
Augolia is a large fortress-style map with strong layered defenses and a central courtyard that becomes the focal point of battle. The attacking side must break through a sequence of outer defenses to reach the final capture point. Augolia is known for its intense gate fights and brutal final hold.
Key Features:
- 2 Front Gates (Left and Right)
- Multiple Ladders and Siege Towers for wall scaling
- Inner Gatehouse before the final point
- Central Courtyard (Final Capture Zone)
- Destroyable Breach
- High defensive battlements and murder holes
Attacker Strategy:
- Siege Phase:
- Deploy siege towers early and protect them—especially the left tower which offers better elevation options [Towards Point B]
- Use culverins and mortars to pressure defenders on walls [Focus Enemy Artillery + Canon units]
- Deploy ladders on far-left and far-right flanks to split defender attention. Your Goal is to reach the walls and kill enemy artillery / Special units to make towers reach the walls.
- Breach Phase:
- After towers land, swarm the walls with fast units, bring special units for blob fights or heavy range DPS (Silla T5)
- Break the breach between B and C (Gate House)
- Option 1) You climb the walls on B and go for D Supply
Option 2) You fight trough the breach and go C or D
Option 3) You play a mix and sneak on D cap
- Final Push:
- Use shield units to anchor the frontline, use heavy range to focus the enemy deff boxes and wipe out their specials
- Bring in push units, use the trebs for main stairs (enemy spawn)
- Use your cav from the side, endcap is a free field no obstacles
Defender Strategy:
- Wall Defense:
- Use long-range artillery and jump down near towers to delay siege towers.
- Set up fast infantry with burst potential to kill enemy heroes reaching the top before they can wipe artillerly and special units
- Kick ladder is the best way to keep walls safe, take care once the enemy reaches the ladder top he can treb your units
- Gate Defense:
- Fortify one gate with shields and artillery—bait attackers to overcommit.
- Use murder holes and deathboxes to suppress attackers at choke points.
- Be ready to fall back before full wipe.
- Courtyard Defense:
- Set up kill zones with range and flames at gate entrance combined with shields and anti cav
- Use your supply points to quickly change to stationary / fast units whatever is in need at that point
- Rotate to supply point if it’s taken—don’t allow free rein behind your lines.
Common Mistakes:
- Attackers overcommitting to one breach and getting flanked.
- Defenders staying too long on walls and getting wiped (after B point is clearly taken) + DONT STAY ON A, YOU DONT DEFEND A!!!!!!
- Ignoring side ladders which allow dangerous backcaps.
Recommended Units:
- Attack: Heavy infantry, Cav for C/D and range for Breach / Endcap phase
- Defense: Shenji Grenadiers (walls), burst units, fast infantry, cavalary for long path charges, range for C and Endcap
Tips:
- Attackers should rotate pressure between gates and walls to exhaust defenders.
- Defenders must conserve units for the final hold—don’t lose your best early.
- Use voice comms or pings to coordinate flanks and reinforce chokepoints.