Unit Guide: Shenji Grenadier
Overview
Unit Type
- Shenji Grenadiers are a top-tier (5-Star) gunpowder unit specializing in throwing explosive grenades. They deal massive area-of-effect (AoE) damage and excel at punishing tightly packed enemy formations.
Playstyle Summary
- Shenji Grenadiers are a high-damage, high-risk ranged unit that can swiftly turn the tide of battle by obliterating large clusters of units. However, due to relatively low defensive stats and a slower firing/throwing cadence, they require careful positioning and protection to maximize their potential.
Key Characteristics
- Massive AoE Damage – Grenades can wipe out waves of infantry (and severely wound enemy heroes) if aimed correctly.
- High Burst Potential – A well-timed salvo can decide a fight or turn a breach assault in your favor.
- Fragile & Vulnerable – Despite their devastating damage output, they have minimal armor and HP, making them prime targets for enemy cavalry or ranged focus.
- Steep Leadership Cost – As an elite 5-Star unit, they demand a significant portion of your leadership budget.
Abilities & Mechanics
Note: Names and specifics may vary depending on the season or patch. The general mechanics remain consistent.
- Grenade Volley / Throw
- Primary attack. The Shenji Grenadiers lob grenades at a target location, causing AoE damage on impact.
- Effective when enemies are clumped together (e.g., at choke points, behind shield walls, or standing on capture points).
- Controlled Volley / Concentrated Throw
- Often a secondary or “veteran-line” ability that allows them to throw more grenades or heavier charges in rapid succession.
- Cooldown-based, so you’ll want to time it when the biggest payoff is possible—like when a large cluster of infantry or cavalry groups up.
- Spread Out / Tighten Formation
- Grenadiers can adopt different formations. Spread out to mitigate incoming artillery or arrow fire. Tighten to concentrate their volley on a tight corridor.
- Suppressive Fire (Some Seasons)
- In some versions or seasons, Shenji Grenadiers may have a short-ranged musket volley for finishing off survivors or providing extra DPS between grenade throws.
- Use it if the enemy is pushing in and you need a bit more consistent ranged output.
Strengths
- Incredible Zone Denial
- Their grenades discourage enemies from grouping, which can disrupt enemy pushes at narrow choke points or on siege towers.
- High Damage vs. Clumped Targets
- A single well-placed volley can kill multiple infantry squads (or heavily damage them), creating openings to push or defend objectives.
- Siege Offense and Defense
- Shenji Grenadiers can defend walls or break defenders on walls with equal effectiveness, making them flexible in siege scenarios.
Weaknesses
- Fragile
- Very low armor, moderate to low HP, and no shields. If caught by cavalry charges, assassins, or direct ranged focus, they will be wiped out quickly.
- Long-ish Windup / Cooldowns
- Grenade throws require a windup, and advanced abilities often have notable cooldowns. Mis-timing or being forced to move can drastically reduce damage output.
- High Leadership Cost
- As 5-Star elites, picking them limits other high-tier units you can bring. Losing them early is a huge blow to your effectiveness.
- Limited Ammo (Situational)
- Depending on the season or specific mechanics, you may need to watch their grenade count or rely on resupply points to maintain maximum damage output.
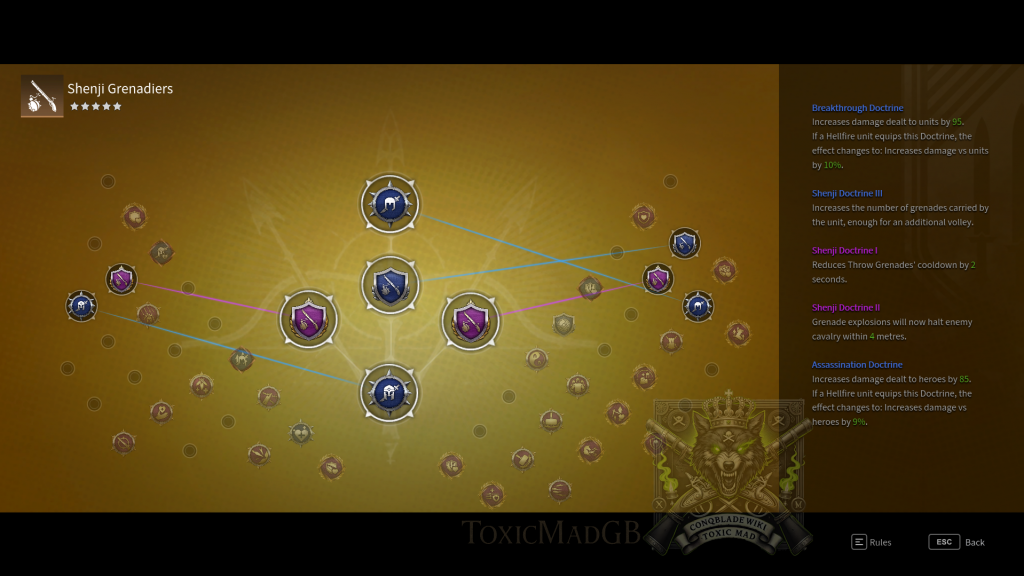
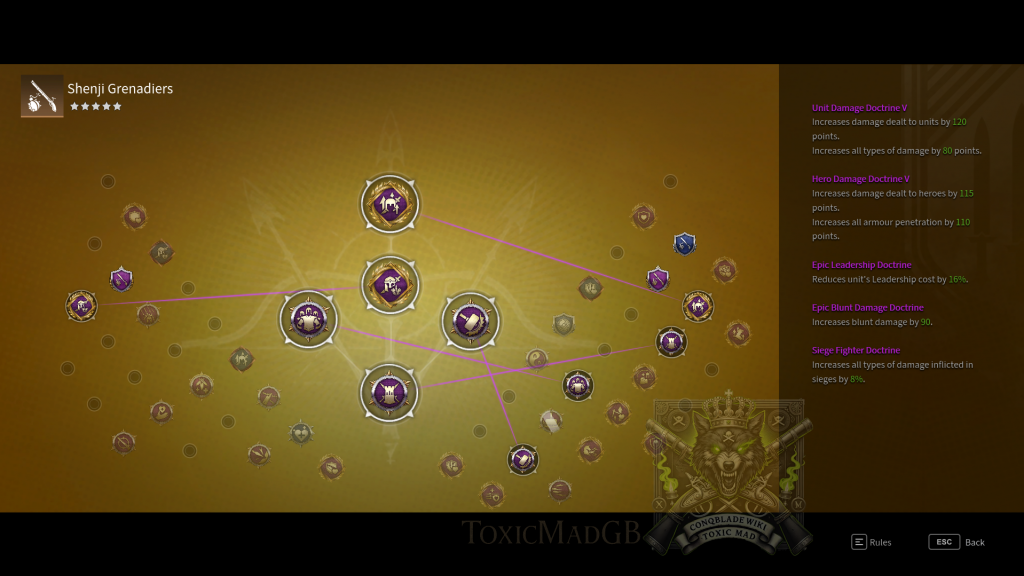
Recommended Doctrines

Unit Strategies and Tactics
- Choke Point Control
- Position Grenadiers at doorways, ramps, or walls where enemies are forced to group. A single volley can devastate a push.
- Cover & Protection
- Always keep them behind a shield unit, siege engine, or terrain feature to block enemy arrows and ballista shots. Pair with spear/shield infantry that can intercept cavalry or assassins.
- Hit and Run
- Throw grenades, then reposition or retreat. Staying too long in one spot makes you a prime target for enemy artillery or flankers.
- Timing is Everything
- Wait until the enemy is firmly engaged (by friendly infantry) or is bunching up on an objective. Then unleash your grenades for maximum effect.
- Flanking Maneuvers
- If an enemy is fighting on your allied front line, circle to the side or rear and lob grenades into the engaged cluster. Make sure you don’t catch your allies too!
Formations & Positioning
- Spread Formation When Idle
- Reduces the risk of catastrophic losses from enemy artillery or ranged focus.
- Also helpful when moving from point to point across open areas.
- Tighter Formation for Focused Throws
- When you’re about to target a specific spot, you may want to condense them slightly to ensure you get an accurate volley.
- Make sure you time it so that you won’t be interrupted by cavalry or sudden flanks.
- High Ground
- If you can position them on walls or elevated terrain in siege battles, they get better range, vantage, and safety from direct melee.
Synergies
- Shield & Spear Units
- These can form a protective line or “box” around your Grenadiers, preventing cavalry or infantry from diving into them.
- AoE Controllers (e.g., Flamethrowers, Mortars, Artillery)
- Combine grenades with other AoE sources to overwhelm large clusters. The cumulative effect can wipe entire squads.
- Tanky Heroes
- Heroes who can soak up aggression at the front let your Grenadiers operate more freely. Example: Longsword & Shield heroes holding choke points.
- Damage Amplifiers (If Season-Specific Buffs Exist)
- Some seasons might have buffs from support roles or hero abilities that temporarily increase damage.
Tips for Success
- Protect Them at All Costs
- Assign your hero or allied units to guard them against flanks and dive attempts. One cavalry charge can ruin your day.
- Be Mindful of Friendly Fire
- Grenades can damage or knock back your allies if they are standing too close. Timing your throws so your allies are not in the blast zone is crucial.
- Rotate with Your Team
- Don’t stay static in a losing lane. If your side is overrun, relocate the Grenadiers to another vantage point or behind a second defensive line.
- Use the Environment
- Seek partial cover behind walls, siege engines, or corners to stay out of direct line-of-sight from enemy archers and artillery.
- Coordinate Your Volley with Crowd Control
- Wait for allied stun, slow, or knockdown abilities to lock enemies in place. Unleashing grenades on a stationary or stunned cluster maximizes kills.
Conclusion
Shenji Grenadiers are among the most rewarding ranged units in Conqueror’s Blade, capable of absolutely shredding enemy squads and heroes alike. Their high-risk, high-reward gameplay requires good positioning, protection, and timing. Command them thoughtfully—ensuring they’re behind a sturdy defense and striking at just the right moment—and you’ll consistently devastate enemy forces. Lose track of them, and you’ll find them quickly cut down by opportunistic charges or focused missile fire.
Master their positioning, protect their flanks, and choose your moments wisely. When played to their strengths, Shenji Grenadiers can shift the momentum of battle and secure decisive victories. Good luck (and happy grenading) on the battlefield!