Unit Guide: Spartan Choosen
1 | Overview
- Tier / Era: ★★★★★ Golden (Season XVI Sparta – Blood & Honour)
- Unit type: Heavy tower‑shield spear infantry
- Unit size: 28 hoplites
- Leadership: ≈ 305
- Battlefield role: Front‑line phalanx that combines unyielding defence with burst counter‑attacks and self‑healing, excelling at holding breaches and punishing cavalry or hero dives.
Forged in the brutal agoge, the Spartan Chosen wield massive aspis tower shields and long spears. They march as one immovable wall, absorbing damage to build Wrath. Once fully charged, they unleash devastating counter‑thrusts that send foes flying. Played well, they can anchor an entire lane, shrugging off arrows while methodically grinding attackers to dust.
2 | Core Traits & Abilities
| Ability / Trait | Mechanics | Battlefield impact |
|---|---|---|
| Charge Counter (30 s CD) | Enter forward‑march stance: rhythmic thrusts knock back & grant 70 % damage‑reduction. Re‑cast triggers shield bash knock‑down; at march end leap‑thrust hits hard (bonus dmg per bash). | Neutralises cav charges, shreds clumped infantry, buys huge stall time. |
| Wrath / Momentum bar | Taking damage (or scoring kills during Ruthless) fills a meter. At max, Spartan Vengeance (auto‑prompt) becomes available — a full‑width shield‑bash + impaling thrust dealing massive AoE. | Rewards soaking pressure; turns defence into sudden offence. |
| Bloodthirst vigor | Every hit heals 4 % max HP (8 % if below 30 % HP). | Exceptional attrition tank. |
| Oath of unity | During any active order, final damage taken –80 % & damage is shared squad‑wide. | Makes them nearly un‑killable while skills run. |
| Formations | Dispersed (vs artillery), Shield (tight wall, best frontal DR), Schiltron (360° turtle). | Adapt to ranged, melee or flank threats. |
3 | Strengths
- Iron‑wall defence — 80 % DR + damage sharing during skills, huge block, stake‑like resistance to knock‑back.
- Reliable self‑heal via Bloodthirst vigor strikes keeps them in the fight without resupply.
- Hard crowd‑control — shield bashes and leap thrusts knock down or stagger heroes & cav.
- Flexible formations — can bunker in Schiltron or push with Shield advance.
4 | Weaknesses
- Skill‑timed power — outside Ruthless/Counter windows, damage is modest.
- Slow movement (5.0 m/s) makes them vulnerable to out‑maneuvering or ranged kiting when relocating.
- Large model count means AoE (Flamers, Grenades) builds Wrath but can still melt HP if caught without DR.
- No brace vs rear — flank shots bypass shield block; protect their sides.
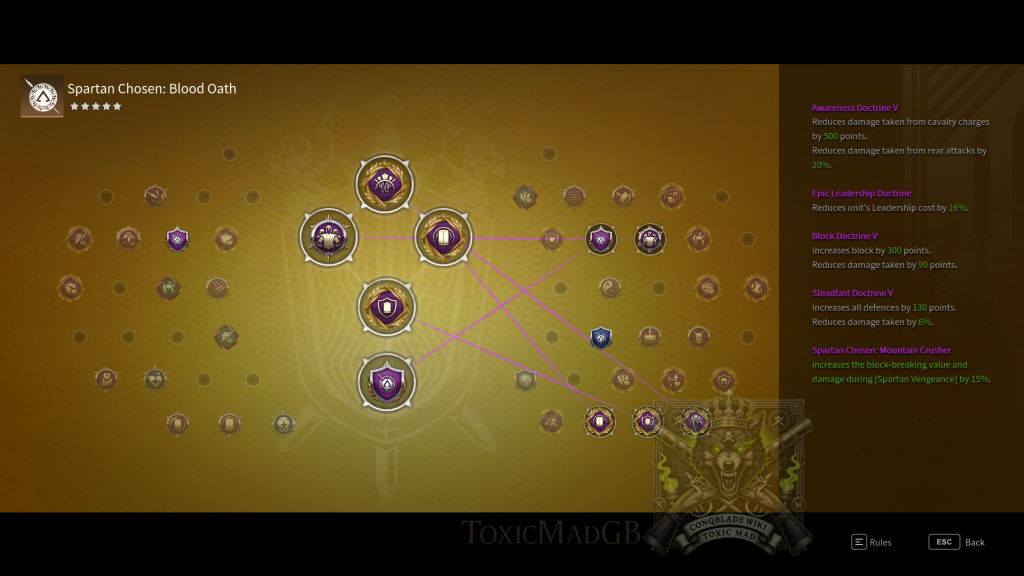
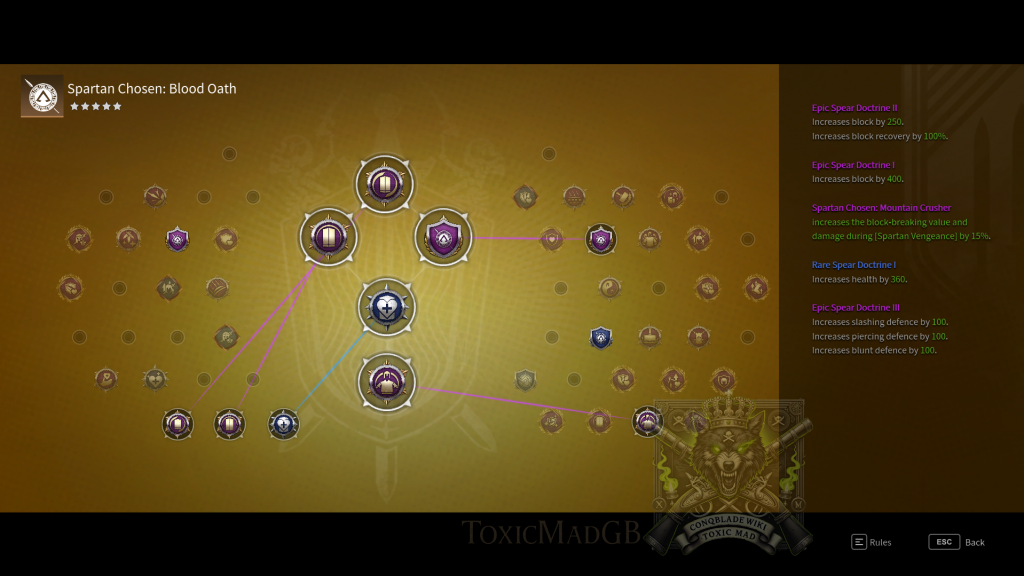
5 | Recommended Doctrine
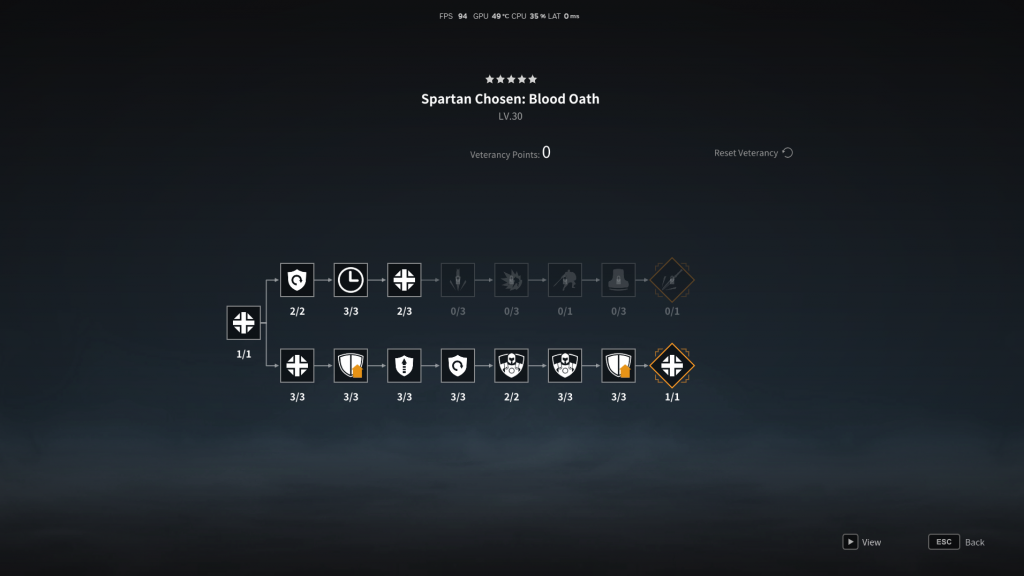

6 | Veterancy Highlights
- Landslide Force path → Charge Counter targets +1 enemy & shorter CD: best for offensive pushes.
- Blood Oath path → –20 % damage during Loyalty Oath: ultimate bunker for breach defence. Choose based on your team’s needs; both end nodes are strong.
7 | Micro‑Play & Tactics
Defensive Hold (Breach / Gate)
- Sit in Shield formation just behind rubble; build Wrath under arrow fire.
- When enemy lines touch shields, pop Ruthless for heal + cleave.
- If cav charges, immediately hit Charge Counter; recast for shield bash as they collide, then leap‑thrust to finish stunned riders.
- Drop back two metres, reform, repeat.
Offensive Push
- Stack Wrath by leading with Shield wall into arrow lanes.
- Upon contact, Charge Counter march to break initial pike brace; bashes knock down front rank.
- Switch to Ruthless to clean up survivors & self‑heal, then pull back on low CDs.
General Tips
- Rotate formation: Shield for frontal fights, Schiltron if flanks threatened, Dispersed when marching under artillery.
- Stagger skills: Never have both core skills on CD simultaneously; keep one DR window ready.
- Wrath awareness: Use Spartan Vengeance early in pushes to open space, not when enemies already retreating.
8 | Allies & Counters
Synergies
- Shield/spear supports .
- Long‑range dps
- Maul/Poleaxe heroes
Threats
- True‑damage DoT (Flamethrowers, Namkhan bleed, rattan poison) bypass block & DR windows + gets split along all units (shared)
- Heavy artillery focus can chunk models between DR cycles.
- High‑impact cav post‑bash — if Charge Counter on CD, Winged Hussars, Yanyuedao and Yeomen eat them
9 | Commander Checklist
- Keep one skill off cooldown before advancing.
- Track Wrath meter; plan Vengeance to coincide with allied pushes.
- Ping flanks constantly; Spartans hate side arrows.
- Withdraw to resupply at ≤ 15 models; healing alone can’t fix attrition after that.
10 | Conclusion
Spartan Chosen excel at turning enemy aggression against itself: the harder they are hit, the stronger their retaliation. Mastering their timing—cycling Ruthless and Charge Counter, managing Wrath, and rotating formations—transforms them into an unbreakable crimson wall that cleaves paths through sieges and field battles alike. Mismanage cooldowns or expose their flanks, and even Spartans will fall. Command with discipline and you’ll hear opponents cry, “This… is… SPARTA!”